madVRの設定 ルビ付き
madVRは、高品質のDirectShowビデオレンダラ
madVR のバージョン 0.92.14
http://madvr.com/
目次
Debug OSD
動画の画面でCtrl + J キーでDebug OSDが表示される。このDebug OSDを見ながらmadVRを設定する。設定時に見る必要がある項目は少し。
display 59.93946Hz
composition rate 59.940Hz
clock deviation 0.00013%
smooth motion on (settings)
D3D9 fullscreen windowed (new path)
NV12, 8 bit, 4:2:0 (DXVA11)
movie 24.397 fps (says source filter)
1 frame drop every 1.17 seconds
movie 1440×1080, 16:9
scale 0,0,1440,1080 -> 0,0,1920,1080
touch window from inside
chroma > Bilinear
image > Bilinear
vsync 16.68ms, frame 40.99ms
matrix BT.709 (best guess)
primaries BT.709 (best guess)
limited range (says upstream)
deinterlacing off (dxva11)
decoder queue 5-5 / 4
upload queue 4-4/4
render queue 4-4/4
present queue 1-1/8
dropped frames 24
delayed frames 0
presentation glitches 6 average stats
rendering 6.44ms
present 0.36ms max stats (55)
rendering 16.70ms
present 32.1 ms
renderingの項目を20ms未満くらいになるようにmadVR設定する。この項目の数値が高いと、フレームの欠落、ぎこちない動きになる。
properties
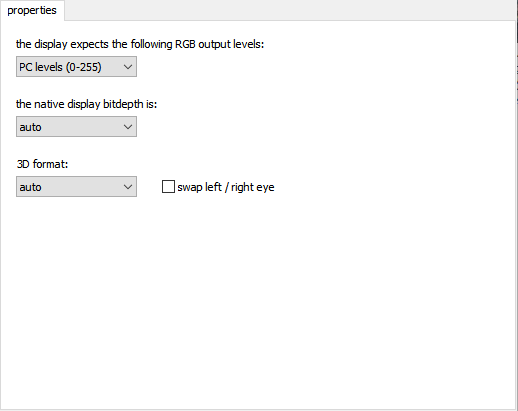
properties
the native display bit depth is:
3D format:
swap / right eye
cailbration
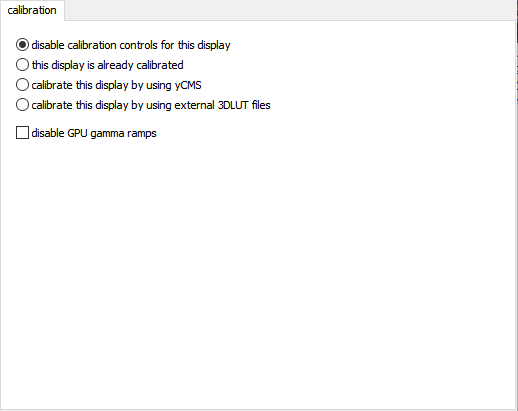
cailbration
⚪this display is already calibrated
⚪calibrate the display by using yCMScalibrate this display by using external 3D LUT files
🔲disable GPU gamma ramps
display modes
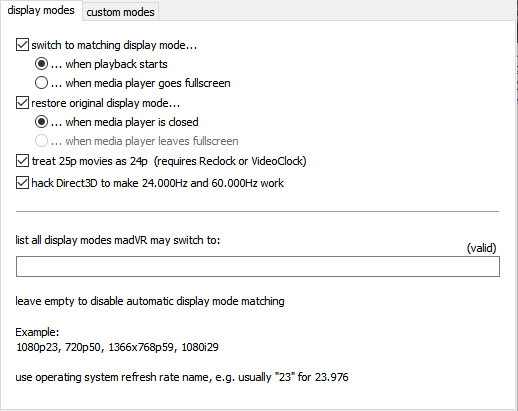
☑switch to matching display mode…
⚫… when playback starts
⚪… when media player goes full screen ☑restore original display mode…
⚫… when media player is closed
⚪… when media player leaves fullscreen
☑treat 25p movies as 24p (requires Recock or Video Clock)
☑hack Direct3D to make 24.000Hz and 60.000Hz work list all display modes madVR may switch to:
(valid) leave empty to disable automatic display mode matching Example:
1080p 23, 720p50, 1366x768p59, 1080129
use operating system refresh rate name, e.g. usually “23” for 23.976
custom modes
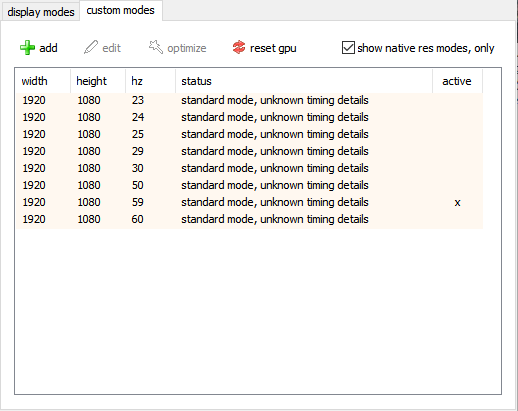
custom modes
add
edit
optimize
reset gpu
🔲show native res modes, only windth
height
hz
status
active
standard mode, unknown timing details
color & gamma

brightness:
contrast:
saturation:
hue:
☑enable gamma processing
desired display gamma / transfer function:
hdr
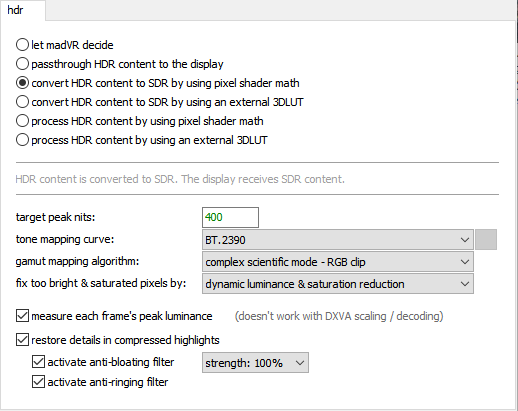
⚪let madVR decide
⚪passthrough HDR content to the display
⚪convert HDR content to SDR by using pixel shader math
⚪convert HDR content to SDR by using an external 3DLUT
⚪process HDR content by using pixel shader math
⚪process HDR content by using an external 3DLUT
HDR content is converted to SDR. The display receives SDR content. target peak nits:
tone mapping curve: gamut mapping algorithm:
complex scientific mode – RGB clip fix too bright & saturated pixels by:
dynamic luminance & saturation reduction ☑measure each frame’s peak luminance (doesn’t work with DXVA scaling / decoding)
☑restore details in compressed highlights
☑activate anti-bloating filter
☑strength: 100%
☑activate anti-ringing filter
Profileルールを設定する方法
https://forum.doom9.org/showthread.php?p=1271417#post1271417
設定例
if (srcWidth <= 720) and (srcHeight <= 480) “SD”
if (srcWidth <= 1440) and (srcHeight <= 720) “HD”
if (srcWidth <= 1920) and (srcHeight <= 1080) “FullHD”
if (srcWidth <= 3840) and (srcHeight <= 2160) “4K”
else “common“
processing
deinterlacing
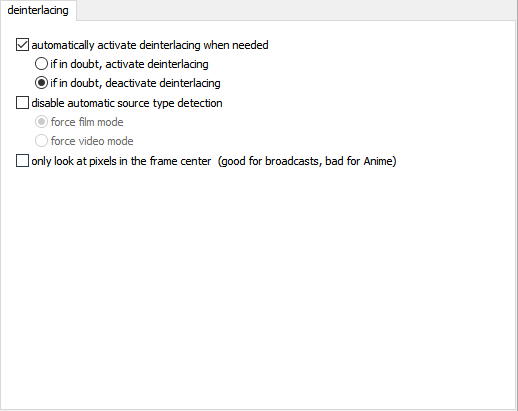
deinterlacing
⚪if in doubt, activate deinterlacing
⚫if in doubt, deactivate deinterlacing
🔲disable automatic source type detection
⚪force film mode
⚪force video mode
artifact removal
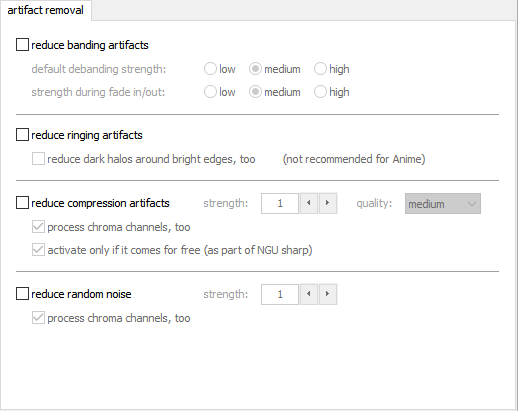 artifact removal
default debanding strength:
strength during fade in/out: low
medium
high
🔲reduce ringing artifacts
🔲reduce dark halos around brightedges, too (not recommended for Anime)
🔲 reduce compression artifacts strength:
☑process chroma channels, too
☑activate only if it comes for free (as part of NGU sharp)
🔲reduce random noise strength:
☑process chroma channels, too
image enhancements
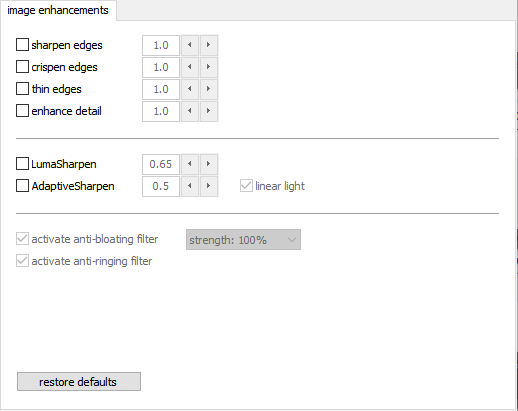 [image enhancements]
sharpen edges
crispen edges
thin edges
enhance detail
crisp-edgesのことかな?
・enhance detail
細部のエッジをシャープにする?
Adaptive Sharpen linear light
activate anti-bloating filter strength: 100%
activate anti-ringing filter
restore defaults
zoom control
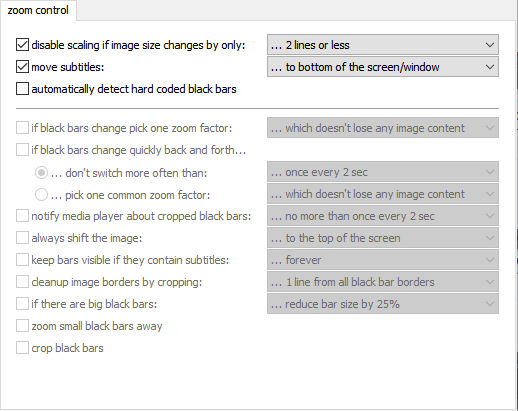
[zoom control] disable scaling if image size changes by only:
…2 lines or less move subtitles:
… to bottom of the screen/window
automatically detect hardcoded black bars
if black bars change pick one zoom factor:
…which doesn’t lose any image content
if black bars change quickly back and forth…
don’t switch more often than:
once every 2 sec
…pick one common zoom factor:
…which doesn’t lose any image content
notify media player about cropped black bars:
…no more than once every 2 sec
always shift the image:
…to the top of the screen
keep bars visible if they contain subtitles: forever
deanup image borders by cropping:
…1line from a blackbar borders if there are big blackbars:
… reducebar size by 25%
zoom small blackbars away
crop black bars
scaling algorithms
chroma upscaling
 processing done by GPU texture units:
⚪Nearest Neighbor
(not recommended)
⚪Bilinear
processing done by custom pixel shader code:
⚪Cubic
⚪Lanczos
⚪Spline
⚪Jinc
⚪Bilateral
⚪Reconstruction
⚪super-xbr
⚪NGU sharpness:
🔲activate anti-ringing filter
🔲activate Super Res filter ,
strength sharpness
hide source artifacts
aliasing
ringing
other artifacts
はノイズになり得る効果。多分
sharpnessシャープネス
hide source artifacts ソース中のアーティファクト除去強度 多分
aliasing
ringing リンギング
other artifacts
image downscaling
 processing done by GPU texture units:
⚪Nearest Neighbor (not recommended)
⚪Bilinear processing done by GPU video logic:
⚪DXVA2 processing done by custom pixel shader code:
⚪Cubic
⚪Lanczos
⚪Spline
⚪Jinc
⚪SSIM 2D – strength:
🔲scale in linear light activate anti-ringing filter
🔲activate anti-bloating filter
🔲relaxed strength:
image upscaling
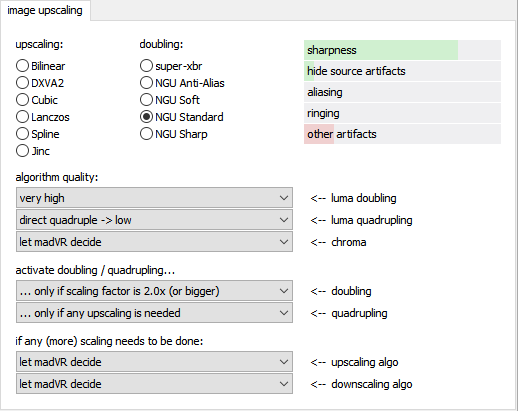 image upscaling upscaling:
Bilinear
DXVA2
Cubic
Lanczos
Spline
Jinc doubling:
super-xbr
NGU Anti-Alias
NGU Soft
NGU Standard
NGU Sharp algorithm quality:
very high <– luma doubling
direct quadruple
-> low <– luma quadrupling
let madVR decide
<– chroma activate doubling / quadrupling…
… only if scaling factor is 2.0x (or bigger)
<– doubling
… only if any upscaling is needed
<– quadrupling if any (more) scaling needs to be done:
let madVR decide <– upscaling algo
let madVR decide <– downscaling algo
use “image downscalig” settings
upscaling refinement
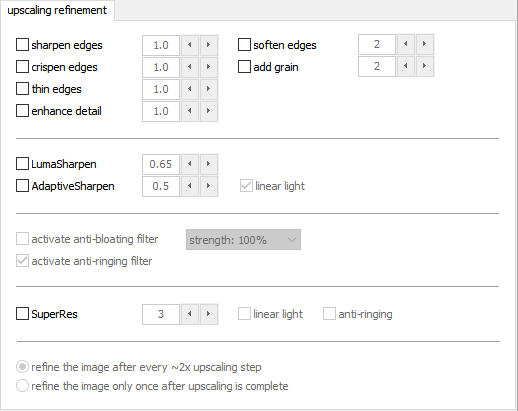 upscaling refinement
🔲sharpen edges
🔲crispen edges
🔲thin edges
🔲enhance detail
🔲soften edges
🔲add grain
🔲LumaSharpen
🔲AdaptiveSharpen
🔲linear light
🔲activate anti-bloating filter
🔲strength:
🔲activate anti-ringing filter
🔲SuperRes
🔲linear light
🔲anti-ringing
⚪refine the image after every 2x upscaling step
⚪refine the image only once after upscaling is complete
general settings
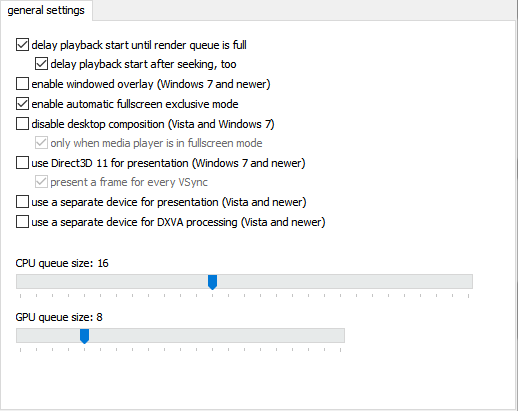 general settings ☑delay playback start until render queue is full
☑delay playback start after seeking, too
🔲enable windowed overlay (Windows 7 and newer)
☑enable automatic fullscreen exclusive mode
🔲disable desktop composition (Vista and Windows 7)
☑only when media player is in fullscreen mode
🔲use Direct3D 11 for presentation (Windows 7 and newer)
☑present a frame for every VSync
🔲use a separate device for presentation (Vista and newer)
🔲use a separate device for DXVA processing (Vista and newer)
CPU queue size: 16
GPU queue size: 8
windowed mode
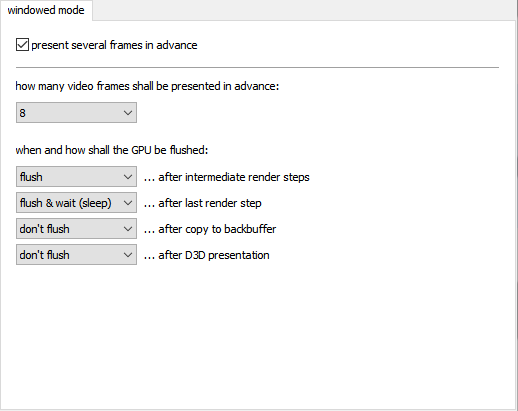 windowed mode ☑present several frames in advance
how many video frames shall be presented in advance: when and how shall the GPU be flushed:
… after intermediate render steps
… after last render step
… after copy to backbuffer
… after D3D presentation flush
flush & wait (sleep) don’t flush
don’t flush
exclusive mode
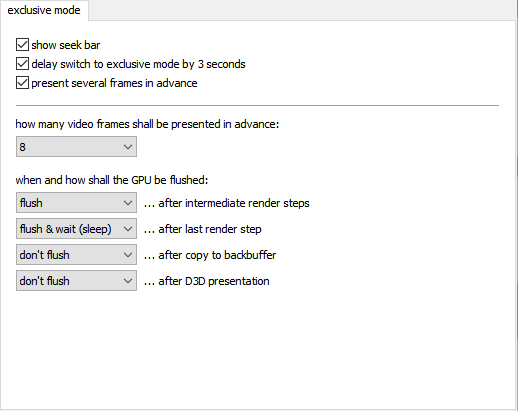
exclusive mode
☑show seek bar
☑delay switch to exclusive mode by 3 seconds
☑present several frames in advance how many video frames shall be presented in advance: when and how shall the GPU be flushed: … after intermediate render steps
… after last render step
… after copy to backbuffer
… after D3D presentation
stereo 3d
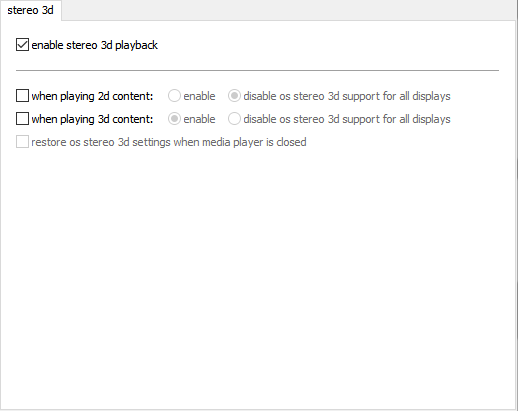
stereo 3d
☑enable stereo 3d playback
🔲when playing 2d content:
⚪enable
⚫disable os stereo 3d support for all displays
🔲when playing 3d content:
⚫enable
⚪disable os stereo 3d support for all displays
🔲restore os stereo 3d settings when media player is dosed
smooth motion
dithering
screenshots
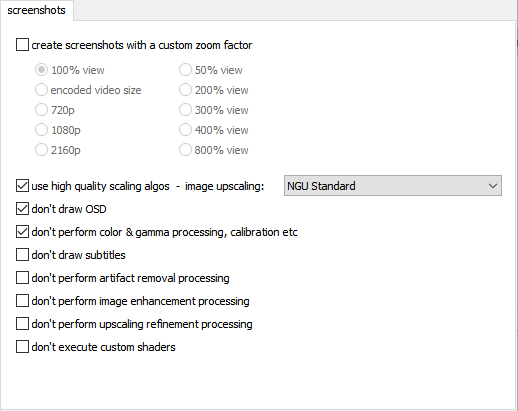
screenshots
create screenshots with a custom zoom factor
100% view
50% view
encoded video size
200% view
300% view
400% view
800% view
720p
1080p
2160p
use high quality scaling algos – image upscaling:
NGU Standard with some added grain
don’t draw OSD
don’t perform color & gamma processing, calibration etc
don’t draw subtitles
don’t perform artifact removal processing
don’t perform image enhancement processing
trade quality for performance
 trade quality for performance these may give a performance advantage for a small loss in quality:
🔲optimize subtitle quality for performance instead of quality
🔲use DXVA chroma upscaling when doing native DXVA decoding
🔲use DXVA chroma upscaling when doing DXVA deinterlacing
🔲store custom pixel shader results in 16bit buffer instead of 32bit don’t use linear light for dithering
🔲don’t analyze gradient angles for debanding
🔲don’t rerender frames when fade in/out is detected
🔲scale chroma separately, if it saves performance
🔲perform tone & gamut mapping in less accurate color space
🔲lose BTB and WTW if it improves performance
🔲don’t use linear light for smooth motion frame blending
🔲use 10bit chroma buffer instead of 16bit
🔲use 10bit image buffer instead of 16bit
🔲run custom pixel shaders in video levels instead of PC levels these should not be used, but you’re the boss:
🔲use half frame rate for DXVA deinterlacing
🔲trust DXVA color & levels conversion
Luminance 明度(めいど)・輝度(きど)・Brightness ブライトネス・色の明るさ度合い
Chroma 彩度(さいど)・色の鮮やかさ